

Artwork, beats & plugins for creators who mean it.
Shop by category
Buy now
New arrivals
Shop design
Producers
How a custom order works
Beats and plugins are instant. Design follows these five steps.
What buyers say
Cover art that
stops the scroll.
Custom album, EP & single cover art, plus visualizers — made from scratch.
Thumbnails built
to get the click.
Custom YouTube thumbnails, high-contrast and made from scratch.
Scroll-stopping
ad creative.
Custom static & social media ad graphics, made from scratch.
Ad portfolio coming soon
I'm still building out this gallery. DM me on Discord to see recent examples in the meantime.
Ask on DiscordProfile pics with
personality.
Custom profile pictures (PFPs), made from scratch.
PFP portfolio coming soon
I'm still building out this gallery. DM me on Discord to see recent examples in the meantime.
Ask on DiscordBeats that
hit different.
Original beats & instrumentals. 30-second previews — buy instantly.
Upload Beat ↗New beats dropping soon
I'm getting the catalog up. DM me on Discord if you want to hear something now.
Ask on DiscordNo beats match those filters — try clearing the search, key, or detune.
Got a beat?
Put it in front of new ears.
Free to submit, no listing fees. Every submission is manually reviewed — nothing goes live automatically. Once approved, it's posted with your name credited and linked.
Submit a Beat ↗Put your beat
in front of new ears.
Rowen's audience is already here looking for beats. Submit yours below — nothing is posted automatically. Every submission goes through a manual review first, and only after it's approved does it go live on rowen.work with its own preview player and cover art, crediting you by name and linking your page.
- Free to submit — no listing fees, ever
- Hosted for exposure and credit, free for anyone to download — not for sale through the site right now
- Manually reviewed by Rowen — most get a decision quickly, but nothing is automatic
- Approved beats go live with your name credited and linked, with a 30-second public preview (not the full track)
Want to actually sell your beat instead of just hosting it? See how that works →
← Back to BeatsGet paid for
your beats.
Submitting is always free. Here's exactly how it works if you want to actually sell a beat instead of just hosting it for exposure.
How it works
Five steps from submitting to getting paid.
Submit your beat
Use the upload form same as always. Free to submit, no listing fees, ever.
Get approved
Every submission is reviewed by hand before it goes live. Most get a decision quickly.
Message your price
Once it's live, DM Rowen on Discord with what you want to charge for it.
Quick Stripe setup
You'll get a one-time onboarding link from Stripe. Verify your identity and add your bank account directly with them — takes about 5-10 minutes. Rowen never sees your bank details.
Get paid automatically
Your beat goes live with a real Buy button. Every sale splits instantly through Stripe — your cut lands straight in your account, no manual payout, no chasing anyone down.
Not 18 yet?
Stripe still lets you get set up — you'll just need a parent or legal guardian to sign off before any money can actually reach a bank account. That's a normal, built-in part of Stripe's own process for anyone under 18, not something specific to this site, and it doesn't change anything about how your beat gets listed or sold.
See the full step-by-step tutorial ↗Quick answers
Do I have to use Stripe?
Yes — right now it's the only payment method that can verify a sale and automatically split your cut. There's no manual option for an actual sale.
Is submitting still free?
Always. Whether you end up selling it or just hosting it for exposure, submitting through the form has never cost anything.
Does Rowen see my bank info?
No. Identity verification and payouts are handled directly by Stripe — that part never touches this site or Rowen personally.
How much does Rowen take?
A flat cut worked out per beat when you message your price — not a fixed site-wide percentage.
Stripe setup,
step by step.
The full walkthrough for getting a beat set up to actually sell. Pick the track that fits you — the steps are a little different if you're under 18.
Submit and get approved
Upload your beat through the normal submission form. Once it's reviewed and goes live, you're ready to move on to setup.
Message Rowen your price
DM on Discord with what you want to charge. Rowen will confirm the split (Rowen's flat cut plus your payout) before anything is set up.
Get your onboarding link
You'll receive a one-time Stripe Connect onboarding link. It's single-use and expires after 90 days, so use it soon after you get it.
Verify your identity with Stripe
The link takes you directly to Stripe, not this site. You'll enter your legal name, date of birth, address, and basic ID details straight into Stripe's own secure form.
Add your bank account
Still on Stripe's site, you'll link the bank account you want paid out to. Rowen never sees your account or routing numbers — that stays between you and Stripe.
Your Buy button goes live
Once Stripe confirms everything, your beat gets a real Payment Link with the split already built in. No further setup needed on your end.
Get paid on every sale
Each purchase splits automatically. Your cut lands in your bank account through Stripe's normal payout schedule — no invoices, no manual transfers.
Submit and get approved
Same as anyone else — upload through the normal form and wait for approval. Your age doesn't affect whether your beat can be submitted or hosted.
Message Rowen your price
DM on Discord with what you want to charge, same as the 18+ track. The split gets confirmed before setup starts.
Get your onboarding link
You'll get the same one-time Stripe Connect link. Stripe does let you start an account under 18 — the extra step comes right after this.
Start your own verification
Enter your own info into Stripe's form same as anyone else. Stripe will flag the account as needing a guardian before payouts can turn on.
A parent or guardian signs off
Stripe requires a legal guardian to confirm the account. They'll need to provide their full legal name, date of birth, the last four digits of their SSN (for U.S. citizens), their address, and agree to Stripe's terms. Stripe tries to verify this automatically first, and may ask for a photo of the guardian's ID if it can't.
Add a bank account
Once your guardian has signed off, a bank account can be linked for payouts. This is still handled entirely on Stripe's side.
Your Buy button goes live and you get paid
Same as the 18+ track from here — your beat gets a real Payment Link with the split built in, and every sale pays out automatically.
Plugins &
sound tools.
VST3 plugins for producers and artists, built from scratch.
Resize an image
Set exact pixel dimensions. Keeps the aspect ratio unless you unlock it.
Resize an image to exact pixel dimensions
Type the width or height you need and this image resizer scales the photo to match. The aspect ratio stays locked by default, so changing one side updates the other; switch Lock ratio off to set both freely. It opens PNG, JPEG, WebP and GIF files, resizes up to 8000 pixels on a side, and always downloads a PNG. The photo stays on your device.
How to resize an image
- Choose a photo or drag one onto the box. Its original dimensions and file size appear at the top.
- Enter a new Width or Height in pixels.
- Turn off Lock ratio if you need a size that doesn't match the original shape.
- Check New size, then press Download.
Shrinking large photos
When you scale an image down to less than half its size, the tool halves it in steps before the final resize instead of jumping straight to the target. One large jump can leave jagged edges on fine detail, and stepping down keeps the result smooth. Making an image bigger works too, but it can't add detail that isn't in the original. Because the output is PNG, a resized photo can have a larger file size than the JPEG you started with. If that matters, run it through the image compressor afterwards.
Compress an image
Shrink the file without changing its dimensions, and see the new size and saving before you download.
Compress an image without resizing it
This image compressor re-encodes a photo at a lower quality so the file gets smaller while the pixel dimensions stay the same. Choose JPEG or WebP, set the Quality slider anywhere from 10 to 100, and the page shows the new file size and the percentage saved before you download. It opens PNG, JPEG, WebP and GIF files and runs in your browser.
How to compress an image
- Choose a photo.
- Pick JPEG or WebP under Format.
- Lower Quality until New size and Saving look right. It starts at 75.
- Press Download.
JPEG or WebP
WebP usually gives a smaller file than JPEG at a similar quality, and it keeps transparent areas. JPEG opens in almost any software, but it has no transparency, so transparent pixels are filled with white. If Saving says the file got larger, the original was already compressed harder than your setting, so lower the quality or keep the file you have. Low settings show first on text and fine lines, so check the downloaded file up close before using it on artwork with lettering.
Convert an image
Swap between PNG, JPEG and WebP. JPEG has no transparency, so pick what fills it.
Convert images between PNG, JPEG and WebP
Change an image's format without opening an editor. Load a PNG, JPEG, WebP or GIF, pick PNG, JPEG or WebP as the output, and the page shows the new file size before you download. The dimensions don't change, and JPEG and WebP are saved at 92% quality. The conversion runs in your browser, so the file isn't uploaded.
How to convert an image
- Choose a photo or drag it onto the box.
- Pick a format under Convert to.
- For JPEG, set Fill transparency to the color that should replace transparent areas.
- Check New size and press Download.
Which format to pick
PNG is lossless, which makes it the right choice for logos, screenshots and anything with transparency or sharp text, at the cost of bigger files. JPEG suits photos that need to open anywhere, as long as you don't need transparency. WebP keeps transparency and usually produces smaller files than either, which makes it a good default for images on the web. For BMP, ICO favicons, PDF or converting a batch of files at once, use the file converter.
Crop to a shape
Centre-crops to a ratio — square for a cover, 9:16 for a story, 16:9 for a thumbnail.
Crop an image to 1:1, 4:5, 9:16, 16:9 or 3:2
Pick a shape and this cropper cuts the largest area of that ratio out of your photo. The ratios cover the usual jobs: 1:1 for cover art and profile photos, 4:5 for feed posts, 9:16 for stories, 16:9 for video thumbnails and 3:2 for a standard photo frame. It opens PNG, JPEG, WebP and GIF files, crops without scaling the pixels, and downloads a PNG.
How to crop a photo to a ratio
- Choose a photo.
- Pick a Shape.
- Drag the Position slider to choose which part of the photo to keep.
- Check Cropped size and press Download.
Getting an exact size
The crop keeps every pixel inside the frame, so the output is as large as your photo allows. A 4000 × 3000 photo cropped to 1:1 comes out at 3000 × 3000. If a platform asks for a specific size, such as 1280 × 720, crop to the ratio here first and then set the exact dimensions in the image resizer. The Position slider disappears when the photo already matches the ratio, because there's nothing left to move.
Make a profile picture
Square, centred and zoomable, with an optional circular cut — transparent corners in the PNG.
PFP maker: circle or square profile picture
Turn any photo into a profile picture. The tool fills a square from the center of your photo, lets you zoom in up to 300%, and can cut the result into a circle with transparent corners. It opens PNG, JPEG, WebP and GIF files and downloads a 256, 512 or 1024 pixel PNG. Nothing leaves your device.
How to make a profile picture
- Choose a photo. The crop is taken from the middle, so a centered subject works best.
- Pick a Size: 256, 512 or 1024.
- Drag Zoom to tighten the framing.
- Leave Round on for a circle or turn it off for a square, then press Download.
Circle or square
Many apps already display avatars as circles, so a square upload is often enough and leaves the app room to frame it. Round is useful where nothing will crop the image for you, like a website, a stream overlay or a video thumbnail, because the area outside the circle is saved as transparent pixels rather than a solid color. If your photo is smaller than the size you pick, it gets scaled up and will look soft. If the subject isn't near the middle, move it into place with the Position slider in the image cropper first, then bring the result back here.
Pull a colour palette
The dominant colours in a photo. Tap any swatch to copy its hex.
Extract a color palette from an image
Upload a photo, cover or mood-board image and this pulls out its most common colors as hex codes. Choose anywhere from 3 to 10 colors, click a swatch to copy its code, or press Download to save the full list as a text file. It reads PNG, JPEG, WebP and GIF files, and the image is processed in your browser.
How to get hex codes from a photo
- Choose a photo.
- Set how many Colours you want.
- Click a swatch to copy its hex code.
- Press Download for a .txt file with one hex code per line.
How the colors are picked
The image is scaled down to a small sample and every pixel is sorted into one of 4,096 color groups. The groups with the most pixels win, and each swatch is the average of the real pixels in its group, so it's a color that actually appears in the image. That means the palette favors area: a large grey sky will outrank a small red logo. To get an accent color that only covers a small part of the picture, crop in on it first. Transparent pixels are ignored, and two close shades can both appear when a color falls on the edge between groups.
Adjust a photo
Adjust brightness, contrast, saturation, warmth and blur with live sliders, then download the edited photo as a PNG.
Free photo editor for brightness, contrast and color
Adjust a photo with six sliders and watch the change as you drag: Brightness, Contrast and Saturation from 0 to 200%, Warmth, Black & white, and Blur up to 20 pixels. It opens PNG, JPEG, WebP and GIF files, and the edited image downloads as a PNG. Editing happens in your browser, so the photo isn't uploaded.
How to edit a photo
- Choose a photo.
- Drag the sliders. Brightness, Contrast and Saturation start at 100%, which leaves the photo unchanged.
- Press Download to save the edited PNG.
- Press Start over to load a different photo with every slider reset.
Size and how the effects work
Photos wider than 1600 pixels are scaled down to 1600 pixels wide for editing and export, which suits social posts and the web but not large prints. The effects use the same filter engine as CSS, so the download matches the preview. Warmth works by blending in a sepia tone, so high values push the whole image toward brown. Blur is measured on the scaled image, which means the same setting looks stronger on a small photo than on a large one.
Convert an audio file
Change sample rate or channels and export a lossless WAV. Nothing is uploaded.
Exports WAV. Browsers can decode almost any audio format but can’t encode MP3 or AAC without a bundled encoder, so this doesn’t pretend to.
Convert audio to WAV and change the sample rate
Load an MP3, M4A, OGG, WAV or other audio file your browser can play and export it as an uncompressed 16-bit WAV. You can leave Sample rate on Keep or resample to 44.1 kHz, 48 kHz or 22 kHz, and leave Channels on Keep or switch to mono or stereo. Before you download, the Export line shows the output format and roughly how big the file will be. Nothing is uploaded.
How to convert an audio file
- Choose an audio file. The Original line shows its format, channels and length.
- Pick a Sample rate.
- Pick Channels: Keep, Mono or Stereo.
- Check the Export line and press Download WAV.
Which sample rate to pick
44.1 kHz is the CD standard and the usual rate for music releases. 48 kHz is standard for video, so match it when the audio is going into a video edit. 22 kHz halves the file size compared with 44.1 kHz but loses the high end, which is acceptable for voice notes and rough demos. Switching stereo to mono combines both channels into one and halves the size again. This page only writes WAV. To convert audio to MP3, 24-bit WAV or AIFF, use the file converter.
Trim the silence
Cuts dead air off the start and end of a recording, keeping a little breathing room.
Exports WAV.
Trim silence from the start and end of audio
This tool finds where the sound actually begins and ends in a recording and cuts the silence on either side. It's useful for voice notes, vocal takes and one-shot samples with dead air before the first hit. Quiet gaps in the middle are left alone. Load any audio your browser can play, such as MP3, WAV, M4A or OGG, and download the trimmed result as a 16-bit WAV.
How to remove silence from a recording
- Choose an audio file. The Original line shows its length and peak level.
- Set Silence below, from -60 to -20 dB. Anything at the edges quieter than this gets cut.
- Set Keep padding, up to 500 ms, so the audio doesn't start or stop abruptly.
- Check the Result line for the new length and how much was removed, then press Download WAV.
Choosing a threshold
The default of -45 dB suits most clean recordings. If background hiss or room noise is being kept, raise the threshold toward -30 dB so the noise counts as silence. If the soft start of a note or a breath is getting clipped, lower it toward -60 dB or add more padding. The cut is made at the first and last samples louder than the threshold on any channel, so a single click or pop near the edge will stop the trim at that point.
Even out the volume
Set a whole recording to a target peak or average level without clipping it.
Exports WAV. This matches peak or average level — it is not a true LUFS broadcast measurement.
Normalize audio to a target level
Normalizing turns a whole file up or down by one fixed amount so it hits a target level. Unlike a compressor or limiter, it leaves the dynamics of the recording as they were. Load an MP3, WAV, M4A, OGG or other audio file, choose whether to match its peak or its average level, set a target between -24 and -1 dB, and download a 16-bit WAV. It runs in your browser.
How to normalize an audio file
- Choose an audio file. The Original line shows its current peak and average level.
- Under Match on, pick Peak or Average.
- Set the Target. It starts at -3 dB.
- Check the Result line for the gain being applied and the new peak, then press Download WAV.
Peak or average
Peak moves the loudest single sample to the target, so the result can't clip. It's exact, but two files with the same peak can still sound quite different in loudness. Average matches the RMS level instead, which lines up how loud clips feel more closely. Raising the average can push peaks past full scale, so the gain is capped to keep the loudest sample at -0.1 dB, and the Result line says "limited to avoid clipping" when that happens. This isn't a LUFS measurement, so don't rely on it to hit a streaming platform's loudness target.
MIDI visualizer
Turn a MIDI file into a falling-note piano roll video. Every track gets its own colour, and you can record the result.
Recording in real time — let it play to the end, then press Stop & save.
MIDI visualizer: piano roll video from a MIDI file
Drop in a .mid or .midi file and watch the notes fall onto a piano keyboard, with each track in its own color and keys lighting up as notes land. You can hide or recolor tracks, restyle the notes and background, and record the result as a video. A MIDI file has no sound of its own, so add a bounce of the same arrangement as a soundtrack if you want audio in the recording. The file is read in your browser.
How to make a MIDI piano roll video
- Choose a MIDI file.
- Under Tracks, untick any you don't want and pick a color for each.
- Adjust Fall time, the note and Glow settings, and the Stage, including a Resolution of 720p, 1080p, Vertical or Square.
- Under Soundtrack, choose your audio bounce.
- Press Record video, let it play to the end, then press Stop & save.
Timing and export
Tempo changes inside the file are followed, so slowdowns and section changes stay in time. With a soundtrack attached, the roll follows the audio's clock, and the audio starts at the very beginning of the MIDI file, so export your bounce from the start of the project too. Recording runs in real time at 30 frames per second, so a three-minute piece takes three minutes, and the video saves as WebM with no watermark. Files that use SMPTE timecode instead of ticks can't be read, so re-export those with standard timing.
Drum kits.
Kits from producers worth knowing about. Most are sold on their own stores — the links go straight there.

Visual drum kit skin editor for FL Studio
Set folder colors, artwork banners and hover text for FL’s Browser, and preview them as you go. Free to design; $10 unlocks one complete skin.
Made a kit?
Send it over and it goes up here, credited and linked straight to wherever you sell it. No cut taken, no fee, nothing to sign.
Serum 2 presets.
Preset packs for Xfer Serum 2. Most are sold on their makers' own stores — the links go straight there.
Made a Serum 2 bank?
Send it over and it goes up here, credited and linked straight to wherever you sell it. No cut taken, no fee, nothing to sign.
Texture packs.
The layers that go over a cover — grain, paper and film overlays, and advisory marks drawn from scratch. Some are sold here, some on their makers' own stores.
Made a texture pack?
Send it over and it goes up here, credited and linked straight to wherever you sell it. No cut taken, no fee, nothing to sign.
Everything else.
Questions, answered.
Payment, revisions, turnaround, refunds and file delivery. Full policies are linked in the footer.
What clients
are saying.
Real feedback from real projects — and a spot to leave your own if we've worked together.
No reviews yet
Be the first to leave one below once we've worked together.
Leave a review
Worked with me before? I'd love to hear how it went. Reviews are checked by hand before they're posted, so it may take a little while to show up.
Find the BPM
of any track.
Drop in an audio file and get its tempo instantly. Everything runs right here in your browser — nothing gets uploaded anywhere.
Analyzing…
Free online BPM finder
Drop in a song and this finds its tempo in beats per minute. It reads any audio file your browser can play, including MP3, WAV and M4A, and gives a whole-number BPM between 60 and 200 with a short note on how confident the read is. The file is decoded and analyzed on your device, not uploaded.
How to find the BPM of a song
- Click Choose an audio file, or drag the track onto the box.
- Wait for the result. Longer tracks are checked in up to five 15-second sections, and the tempo those sections agree on most strongly wins.
- If the number is off by a clean ratio, press ½×, 2×, ⅔× or 1.5× to correct it.
- For a second opinion, press Tap to the beat in time with the music. The readout averages your last eight taps.
Why the BPM can read as half or double
The detector listens for hits in two ranges, kick and bass in one and snares and hats in the other, then looks for the spacing that repeats most strongly. A 140 BPM trap beat and a 70 BPM half-time feel share most of that spacing, so either can win. Syncopated basslines and triplet patterns can throw it off by 2:3 in the same way. The correction buttons scale the current reading instead of re-running the analysis, so you can step between options until the number matches what you hear.
Find the musical
key of any track.
Drop in an audio file and get its key, plus how far its tuning sits from A=440. Runs locally in your browser — nothing gets uploaded.
Analyzing…
Song key finder with a tuning check
This song key finder reads an audio file and names its key, such as A Minor or F♯ Major. It also measures how far the recording sits from standard A=440 tuning, in cents, and when it's off, shows the reference pitch it's actually tuned to. Any format your browser can decode works, including MP3, WAV and M4A, and the analysis runs locally without uploading the file.
How to find the key of a song
- Choose an audio file or drag one onto the box.
- The tool checks the tuning first, then the key, using the loudest sections of the track.
- Read the key, the tuning line under it and the note below. When the call is close, the note names the runner-up key.
Detuned tracks and relative keys
Tape rips, sample-rate mismatches and deliberate pitch shifts can push a whole track a few cents sharp or flat. When the tuning read is clear, the key is measured against that shifted pitch instead of A=440, and the note tells you how many cents to pitch the track to bring it back to standard. The most common mix-up is between a major key and its relative minor, like C Major and A Minor, because they share the same notes. When those two are nearly tied, the tool checks the bassline to settle it. Keys are written with sharps, so D♭ Major appears as C♯ Major.
Mock up your
album cover.
Preview your artwork on a phone screen, a music player card and a vinyl record, then download each mockup as a PNG.
Cover art mockup generator
Upload your album or single artwork and see it in three places: a phone now-playing screen, a music player card and a vinyl record with the art as the center label. Add a track title and artist name and the phone and player mockups update as you type. Each mockup downloads as its own PNG with a rowen.work mark in the corner. Rendering happens in your browser, so the artwork stays on your device.
How to make a cover art mockup
- Choose your cover art. Any image your browser can open will work, and square art fits best.
- Type the Track Title and Artist Name.
- Check the three previews.
- Press Download under the mockup you want to keep.
Non-square artwork and long titles
Every art slot is square. If your image isn't, the tool crops it from the center to fill the slot instead of stretching it, so the edges of a wide or tall image get cut off. For a preview that matches your actual release, crop to 1:1 first and make sure nothing important sits near the edges. Titles and names that are too long for the layout are shortened with an ellipsis. If you'd rather have the artwork designed for you, see custom cover art.
Visualize your
track live.
Upload a song, pick one of eight visualizer styles and your colors, and record it as a video. Everything plays and renders in your browser.
Free music visualizer for your tracks
Load a song, watch it react as it plays, then record the result as a video. There are eight styles: Bars, Mirror Bars, Waveform, Spectrum, Circular, Rings, Particles and Starburst. Color can be solid, gradient, rainbow or reactive, the background can be a solid color, a gradient or your cover image blurred behind the motion, and you can add a title and artist overlay. Playback, rendering and recording all happen in your browser.
How to make a visualizer video
- Choose an audio file and press play to preview it.
- Pick a Format (Landscape, Square or Vertical) and a Style.
- Adjust the colors, background, Sensitivity, Glow, Bar / Segment Count and Trail until it looks right.
- Press Download. The track restarts from 0:00 and records to the end, or press the button again to stop early.
What to expect from the export
Recording happens in real time, so a three-minute song takes three minutes to capture, and you'll hear it play while it records. The file is WebM in most browsers, or MP4 where that's the only video format the browser can record. The video's pixel size follows how large the preview is on your screen, so a bigger window gives a higher-resolution file. Every export carries a rowen.work watermark. If the Download button is greyed out, your browser can't record canvas video, so try Chrome or Edge.
Turn your track into
a waveform image.
Upload a song and export a clean, fully customizable waveform graphic — for cover art, posters, or social posts. Rendered entirely in your browser.
Waveform generator: turn audio into a PNG or SVG
This waveform generator draws the shape of an entire song as a still image for cover art, posters or social posts. Load an MP3, WAV, M4A or any other audio file your browser can decode, style the waveform, and download it as a PNG or an SVG. The audio is analyzed on your device.
How to make a waveform image
- Choose an audio file.
- Pick a Format: Landscape, Square, Vertical or Banner (3:1).
- Choose a Style (Bars, Mirror Bars, Line, Filled, Blocks or Dots), then set the colors, background, Bar / Point Count, Thickness, Roundness and Padding.
- Under Export, pick PNG or SVG. For PNG, also pick 1×, 2× or 3× resolution.
- Press Download.
PNG or SVG
Exports are 1600 pixels wide at 1×, so a 3× PNG is 4800 pixels wide. SVG keeps every bar, line and dot as a vector shape, which stays sharp at any size and can be recolored in a vector editor. A Transparent background works in both formats. The Cover Image background only renders in PNG; an SVG export uses your solid background color in its place. Title and artist text in an SVG names its fonts rather than embedding them, so it can show in a fallback typeface on a computer that doesn't have them. Both formats include a rowen.work watermark.
Turn a lyric into
a shareable graphic.
Drop in a line, pick a style, and export a clean typography card sized for socials. Rendered entirely in your browser.
Lyric card maker for posts and stories
Type a lyric or quote and this turns it into a typography graphic sized for social media. The text scales itself to fill the frame, and you can choose Square, Post (4:5), Story (9:16) or Landscape. Styles range from plain text, oversized quote marks, a card behind the words, a bold weight and an underline, to layouts modeled on the Spotify and Apple Music lyrics screens. Graphics download as PNG or SVG with a rowen.work watermark.
How to make a lyric graphic
- Type or paste the line into Lyric / Quote. Line breaks you add are kept.
- Pick a Format and a Style.
- Choose the Font, Text Color Mode, Background and Size. Press Show Credit to add a line such as the song title and artist.
- Pick PNG at 1×, 2× or 3×, or SVG, then press Download.
The Spotify and Apple Music styles
These two swap the normal layout for a recreation of an app's lyrics view. Each line you type becomes a lyric line, the middle line is highlighted as the one playing, and a mini player shows the Track Title and Artist you enter. If you upload a Cover Image background, it also fills the album thumbnail. The icons are simple drawn shapes, not the apps' real logos. For these styles the PNG export is the safer choice, because the SVG version names its fonts instead of embedding them and the text can change typeface on another computer.
Trim your track
down to size.
Drag to select the exact section you need, preview it, and export — with fades, gain, and normalization. Runs entirely in your browser.
Free online audio trimmer
Cut a clip out of a song, voice note or sample without installing an editor. The trimmer shows the waveform, lets you drag out the section you want, and exports it as a 16-bit WAV or a smaller WebM file with optional fades, gain and peak normalization applied. It opens MP3, WAV, M4A and other formats your browser can decode, and the decoding, editing and export all run in your browser.
How to trim an audio file
- Choose an audio file. The whole track starts out selected.
- Drag across the waveform to select a section, drag the handles to fine-tune it, or type exact Start and End times.
- Press Preview Selection to loop the section.
- Set Fade In and Fade Out (up to 5 seconds), Gain (±12 dB) or Normalize Peak.
- Choose WAV (lossless) or WebM (smaller), name the file and press Download.
WAV or WebM
WAV is written straight from the edited audio and downloads as soon as it's rendered, so pick it for anything going back into a DAW. WebM is compressed, which makes it much smaller, but the browser has to play the clip through to record it, so the export takes as long as the clip. Fades and gain are applied when you export, not during the preview. If you need an MP3, trim to WAV here and then run it through the file converter.
Edit your MP3's
tags & cover art.
Update title, artist, album, genre, cover art and more, then download the tagged file. Existing tags are read automatically — nothing leaves your browser.
MP3 tag editor with cover art
This MP3 tag editor reads the ID3 tags already on a file and lets you change them before you send the track out. You can edit the title, artist, album, album artist, genre, year, composer, track and disc numbers, BPM and a comment, and add, replace or remove the embedded cover art. The download is the same audio with a fresh ID3v2.4 tag, and nothing leaves your browser.
How to edit MP3 tags
- Choose an MP3. Existing tags and artwork fill the form automatically.
- Edit the fields. Genre offers the standard ID3 genre list, or Custom… for your own.
- Press Upload under the cover to add artwork, or Remove to clear it. Press Detect next to BPM to fill in the tempo.
- Set the Filename and press Download.
What gets written to the file
The editor removes any old ID3v2 tag at the start of the file and any ID3v1 tag at the end, then writes one new tag, so players don't find two conflicting sets of details. The audio itself isn't re-encoded. Only the fields on this form are written, so tags it doesn't show, such as embedded lyrics or an ISRC, won't carry over, and empty fields are left out. Uploaded cover images are saved as JPEG and scaled so the longest side is no more than 1000 pixels. Text is stored as UTF-8, so accented and non-Latin names come through. The editor works with MP3 files only.
Merge multiple tracks
into one file.
Combine clips in any order with gaps or crossfades, per-track gain and fades, and normalization — then export. Everything happens locally in your browser.
Audio merger: join tracks into one file
Combine two or more audio files into a single track in your browser. Add your clips, put them in order, and join them with a gap of silence or a crossfade. Each clip has its own gain, fade in, fade out and mute, and the finished mix exports as a 16-bit WAV or a WebM file. It accepts MP3, WAV, M4A, OGG and FLAC.
How to merge audio files
- Choose audio files. You can select several at once and add more later.
- Use the arrows to reorder clips, and set Gain, Fade In and Fade Out on each row.
- Pick Gap (0 to 5 seconds) or Crossfade (0.1 to 3 seconds).
- Press play to hear the mix, and adjust Master Volume or Normalize Peak.
- Choose WAV or WebM, name the file and press Download.
How crossfades and normalization work
In Crossfade mode each clip starts before the previous one ends, overlapping by the length you set, and the two ends fade out and in across the overlap. A crossfade can't be longer than either clip it joins. Normalize Peak is on by default: after mixing, it scales the whole file so the loudest moment lands just under full scale, which also stops an overlap from clipping. The preview plays the same render the WAV export saves. WebM export plays the mix through in real time to record it, so it takes as long as the track.
Convert a file
Drop anything in and pick what it should become. Images, audio, spreadsheets and documents — converted on your device, never uploaded.
Nothing queued yet. Every conversion below runs on your own device — no upload, no account, no watermark.
What it converts
Images
PNG · JPEG · WebP · GIF · BMP · AVIF · SVG · ICO
→ PNG, JPEG, WebP, BMP, PDF, and a six-size ICO favicon.
Audio
MP3 · WAV · M4A · AAC · OGG · Opus · FLAC · AIFF
→ MP3 at up to 320 kbps, or WAV at 16 or 24-bit, or AIFF.
Video
MP4 · MOV · WebM
→ its audio track as MP3, WAV or AIFF, or a still frame as PNG or JPEG.
Data
CSV · TSV · JSON
→ each other, plus a Markdown or HTML table.
Documents
Markdown · TXT · HTML
→ HTML, Markdown, plain text, or a paginated PDF.
What it can’t, and why
- MP3 needs a real encoder, and this page carries one. No browser can write an MP3, so unlike every other format here — which are containers wrapped around bytes the browser already gave us — MP3 needs actual code. That code is LAME, the reference MP3 encoder, running on your own machine. It is fetched only when you pick MP3, so nobody pays for it who does not use it, and your file still never leaves the device.
- No AAC or M4A out. Same problem as MP3, without an encoder anyone has ported. MP3 at 320 kbps plays everywhere AAC does.
- No video transcoding. Re-encoding video needs a full codec suite; the honest version of that is a 30 MB download. Video files here give up their audio track and a frame instead.
- Audio is decoded through the browser’s audio engine, which resamples to whatever rate it is running at — usually your sound card’s. So the sample rate above is read out of the file’s own header (WAV, AIFF, FLAC and MP3) and the decode is pinned to it, which is why a 44.1 kHz track stays 44.1 kHz. For other formats it falls back to your device’s rate unless you pick one.
- No HEIC in. Only Safari can decode it. On an iPhone, Settings → Camera → Formats → “Most Compatible” saves JPEGs from then on.
- No PDF or Word in. This page writes PDFs; reading one back means shipping a whole PDF engine. Word files are a zipped XML format that needs the same kind of dependency.
Large files are converted one at a time, on purpose — decoding several at once is how a phone runs out of memory halfway through.
MP3 encoding uses LAME, via lamejs, under the LGPL. It is the only third-party code on this site, and it runs in your browser like everything else here.
Free file converter for audio, video, images and data
Drop in one file or a whole batch and choose what each should become. Audio files, including MP3, WAV, M4A, OGG, FLAC and AIFF, convert to MP3 at up to 320 kbps, to WAV or to AIFF, which covers the everyday WAV to MP3 job. MP4, MOV and WebM videos give up their audio track or a still frame. Images convert to PNG, JPEG, WebP, BMP, PDF or a multi-size ICO favicon, depending on the source. CSV, TSV and JSON convert to each other or to a Markdown or HTML table, and Markdown, text and HTML documents can become a PDF. Nothing is uploaded.
How to convert files
- Choose files or drag them in.
- Pick the output format from the menu on each row.
- Set Quality, Fill transparency, MP3 bitrate, Audio sample rate or SVG export width where they apply.
- Press Convert on a row or Convert all, then download each file or press Download all as .zip.
Sample rates, MP3 and limits
For WAV, AIFF, FLAC and MP3 files, the sample rate is read from the file itself, so a 44.1 kHz track stays at 44.1 kHz. For other formats, pick a rate under Audio sample rate if it matters. MP3 encoding uses the LAME encoder, which loads only when you convert to MP3. With two or more images queued, Combine images into one PDF puts each on its own A4 page. The converter can't write AAC, M4A or video, and it can't read HEIC, PDF or Word files.
21 free tools.
No sign-up, no upload. Open a folder.
Everything runs in your browser. Nothing you drop in is ever uploaded.
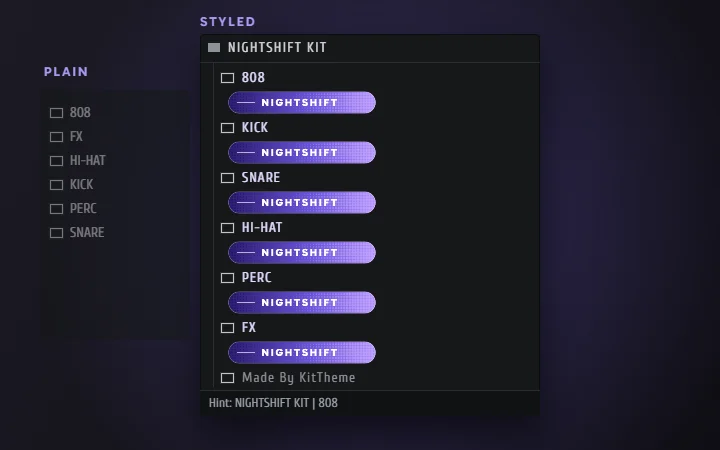
Visual drum kit skin editor for FL Studio.
Turn your artwork into folder banners, colors and hover text for FL’s Browser, and preview it as you go. Free to design; $10 unlocks one complete skin.
Open KitTheme ↗I'm not taking new
design projects right now.
Commissions are currently closed. Beats and VSTs are still available, and you're welcome to reach out on Discord to be notified when they reopen.
Tell me about
your project.
A few quick questions, one at a time — I'll reply with a timeframe and quote. How payment works is covered near the end.
- Made from scratch, any style
- Revisions included on every project
- Watermarked preview before final files
Other ways to reach me
No need to fill out a form if you'd rather just talk first.
Discord (fastest)
Best for quick questions, sharing references, and getting the fastest replies.
Join the DiscordPayment
CashApp, Venmo, Apple Pay, or card via Stripe. Usually a deposit after your quote — but you're also welcome to pay upfront if you'd rather not wait.
Everything for sale
Nothing matches
Try a wider price range.
Review your order
$100 GIVEAWAY
$100 CASH A FREE ALBUM COVER
HOW TO ENTER
-
LIKE + REPOST the giveaway post ↗
-
FOLLOW @blikelandoo + @yoorowen on Instagram
-
SHARE to your Instagram story + tag @blikelandoo
-
SUBMIT YOUR USERNAME right here ← YOU'RE HERE
-
TAG PEOPLE in the comments of the post ↗ — 1 tag = 1 new entry. Unlimited entries.
ENTRIES ARE CLOSED — WINNER GETS PICKED SOON. WATCH @BLIKELANDOO + @YOOROWEN
SHARE THE WORD AROUND — LET'S MAKE THIS THE BIGGEST SONG WARS IN HISTORY
This page
doesn't exist.
The link may be old or mistyped. Everything that's still here is a click away.